Manual assignment
The manual booking assignment method involves the bookings that have already been created by the managers on the engagements that have been set up within Dayshape. These bookings have been requested and are considered unassigned (these would include the bookings created in Engagement Creation).
To view and then eventually assign all these bookings:
-
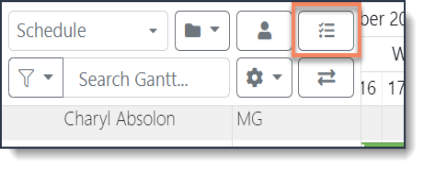
Open the unassigned bookings section of the Gantt by clicking the bookings button at the top left of the Gantt.
-
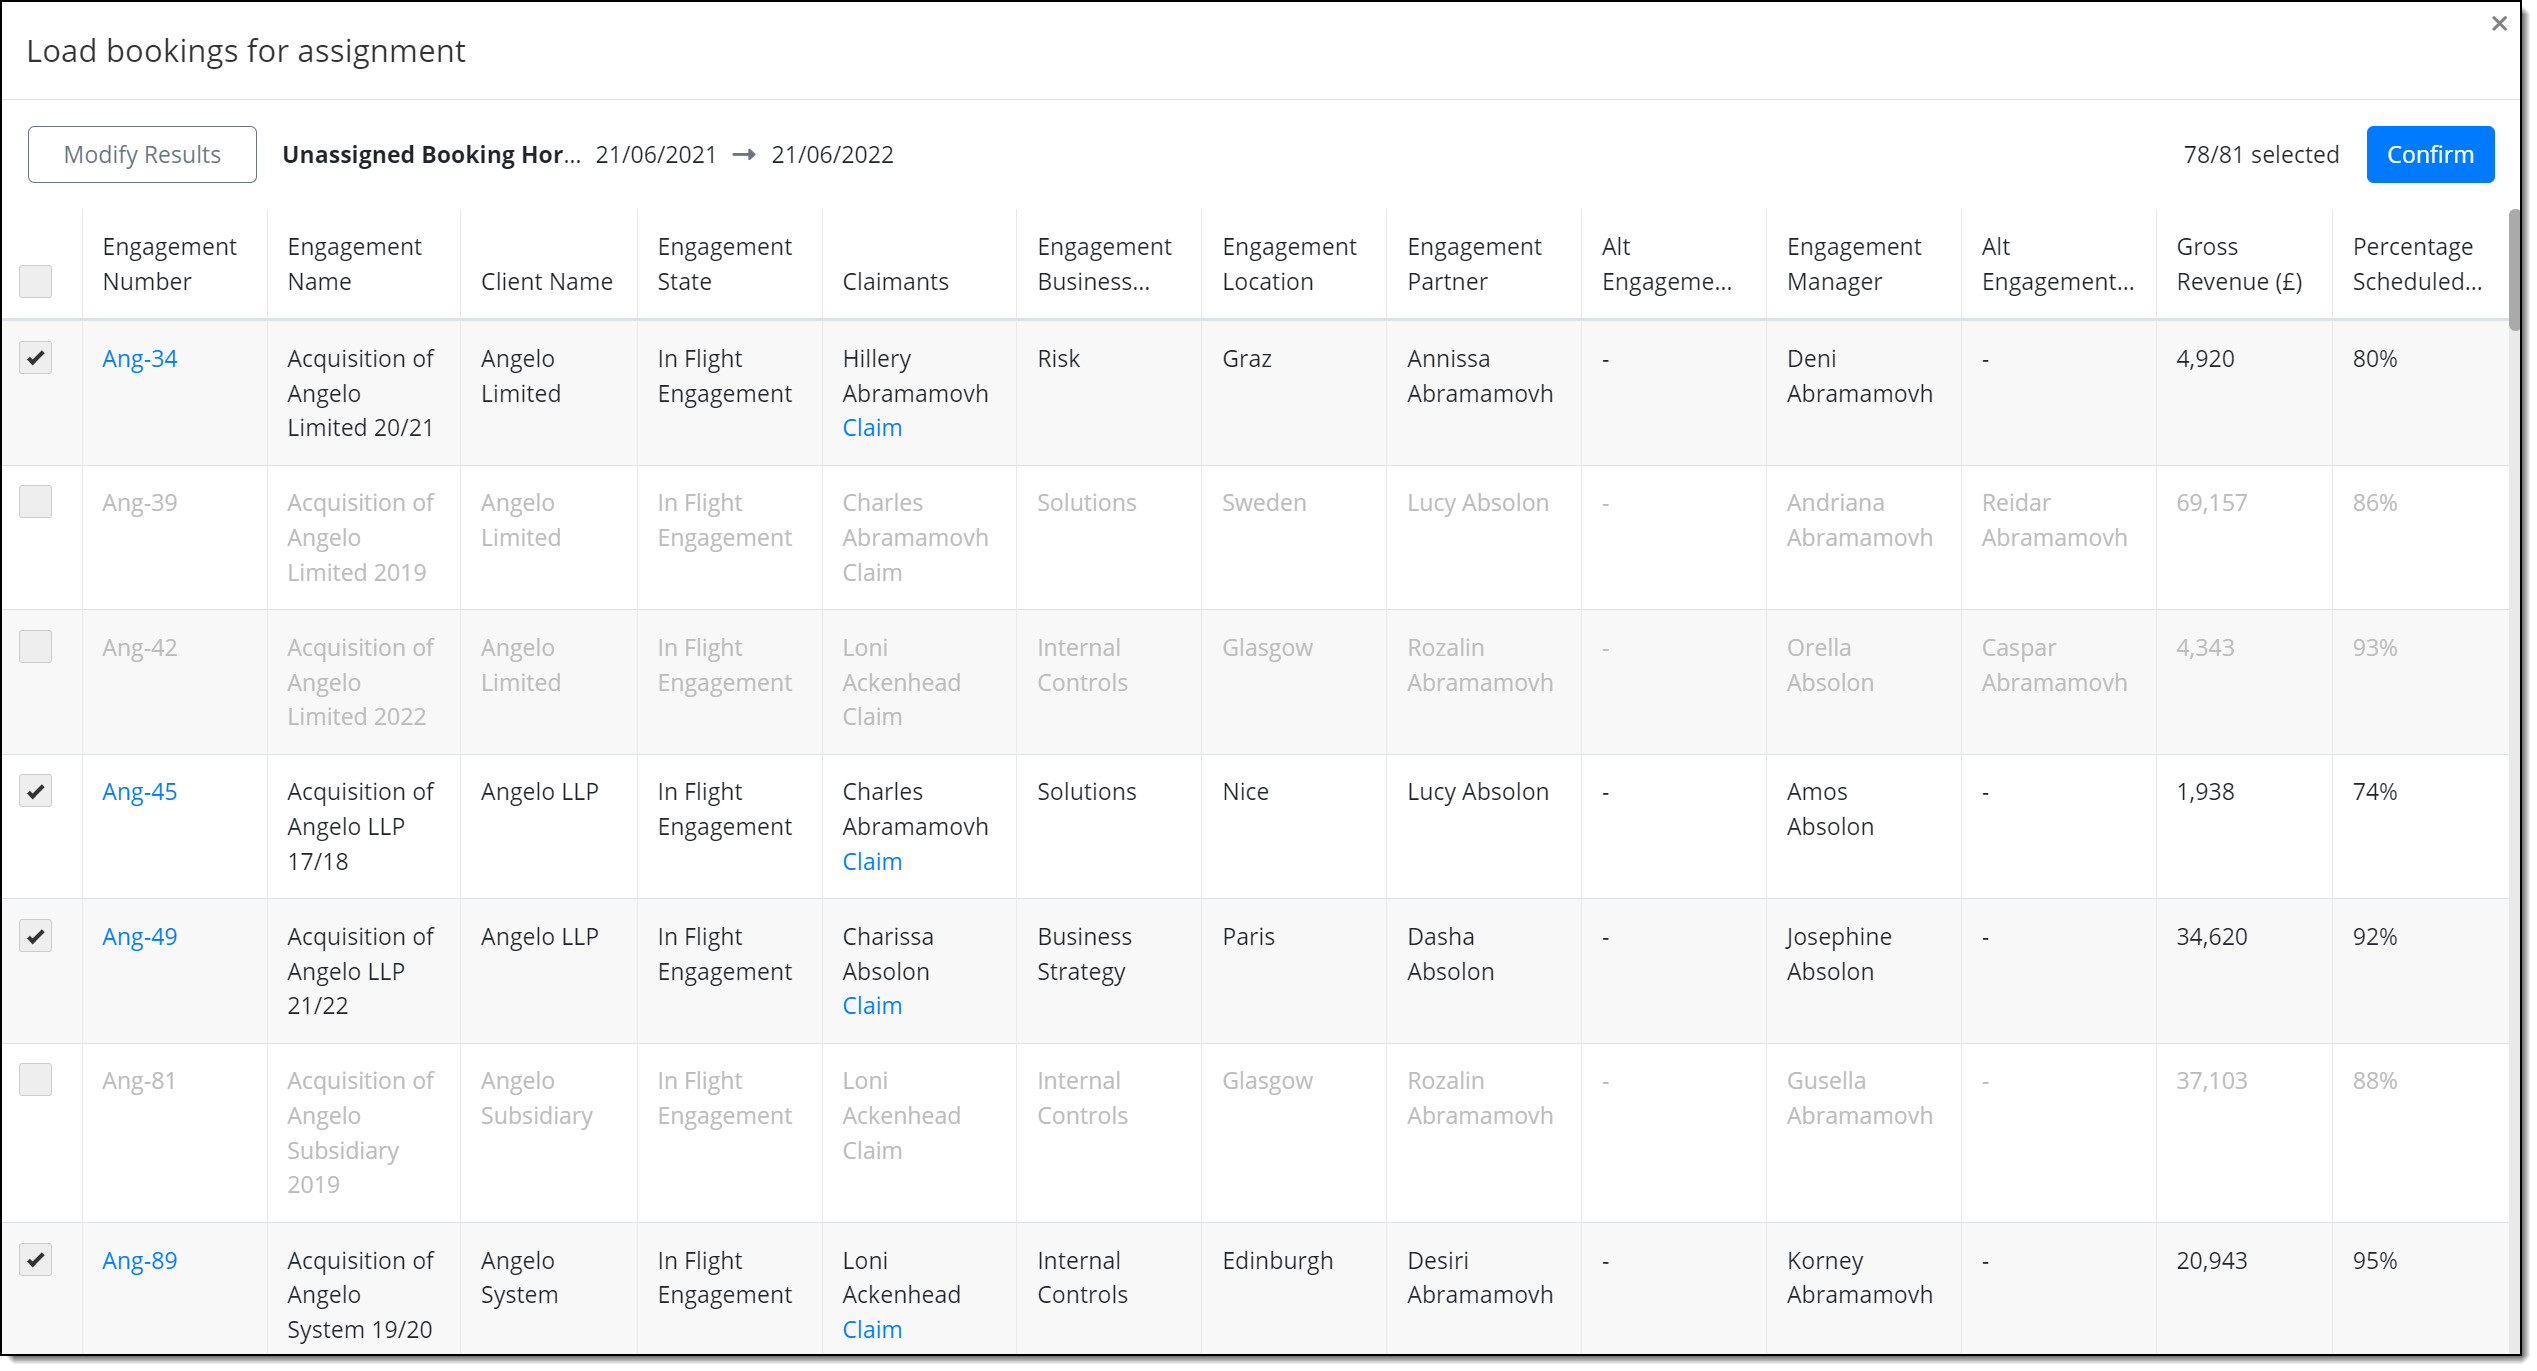
A pop-up window will appear which allows you to build up filters to find the unassigned bookings that you are interested in. Define appropriate filters (ideally that are related to the current population you are showing on the Gantt). For example, if you are currently viewing Resources located in Edinburgh it would make sense to search for unassigned bookings where the request is only for Resources in Edinburgh.

-
You can use the date range fields to load only a selection of bookings that fall within a defined period of time. In the example above, only a three month period is selected.
-
Select Search for Bookings. A list of engagements that include unassigned bookings that meet your search criteria is displayed (as in the example below). At this point, you can select/deselect to further filter the bookings to be loaded. If no results are displayed, click Modify Results and adjust your filters as described in step 2 above.
-
Select Confirm.
The Gantt view reloads, and you will see that you now have two separate sections. The top section is the main Gantt that you had open, and the bottom section is the unassigned bookings panel which shows all the unassigned bookings sorted per engagement. The divider between the two panes can be used to drag the bottom section up or down to ensure you can see as much as necessary of both sections.
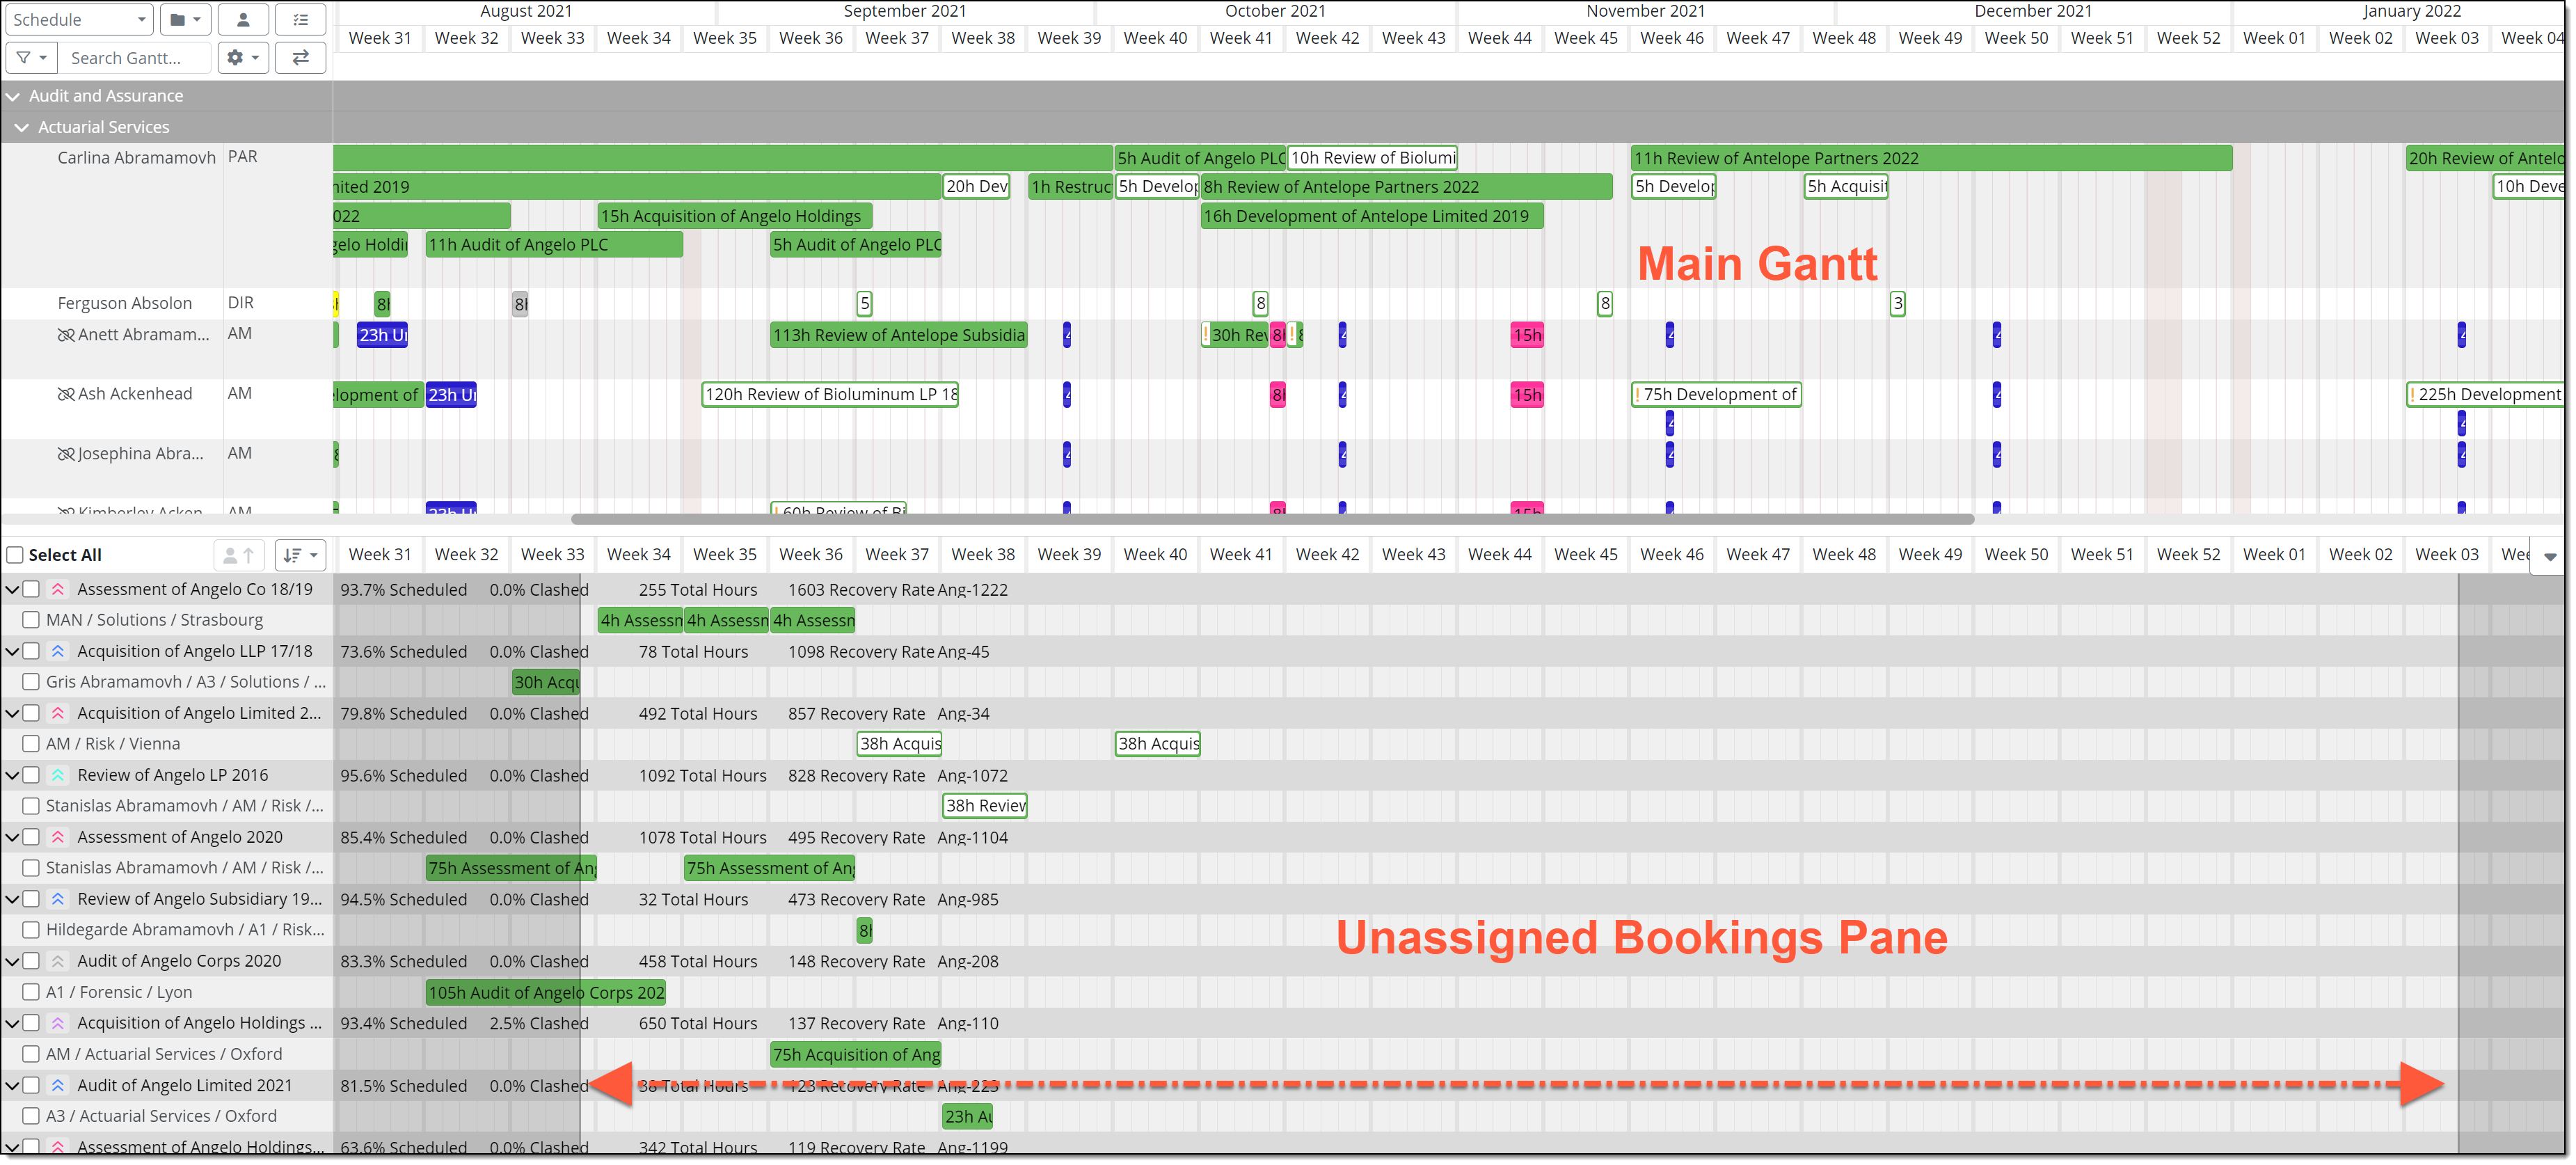
Unassigned pane shadow highlights unassigned bookings loaded within specified dates
The Unassigned pane header has tools to enable efficient booking assignment:
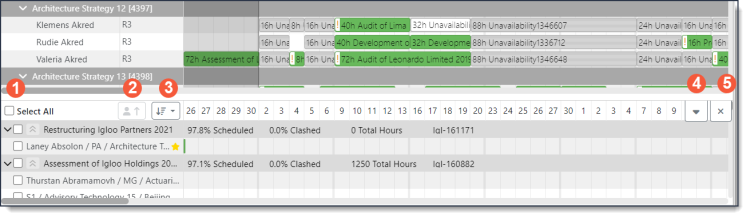
1 The Select All button will select every Unassigned Booking in the Unassigned Bookings section so that they can be assigned out together.
2 Automatically assign all bookings to specifically named resurces provided they currently appear in your Gantt view.
3 Unassigned booking sorting options (see step 6 below).
4 Minimise the Unassigned pane.
5 The Select All button will select every unassigned booking in the Unassigned Bookings section so that they can be assigned out together.
There are a few handy short cuts within the Unassigned Bookings section that can be used to assist the assigning process.
The ‘Select All’ check-box selects all unassigned bookings in all resource rows with just one click:

All unassigned work can be selected using the Select All check-boxCheck-boxes are used for selecting all bookings within their respective resource rows. When you click a resource row, it selects all bookings within that resource row and cancels any previously selected resource rows. This allows you to easily check resource rows one at a time. Ctrl+Click can be used to select multiple resource rows.
Similarly, a check-box enables easy selection of all bookings within engagements. Additional entire engagement selections are made using the normal Ctrl+Click method:
 All unassigned work in an engagement is selected using the Engagement header check-box
For consistent selection within Engagement View, clicking the check-box in the ‘Unassigned’ header selects all unassigned bookings within the engagement:
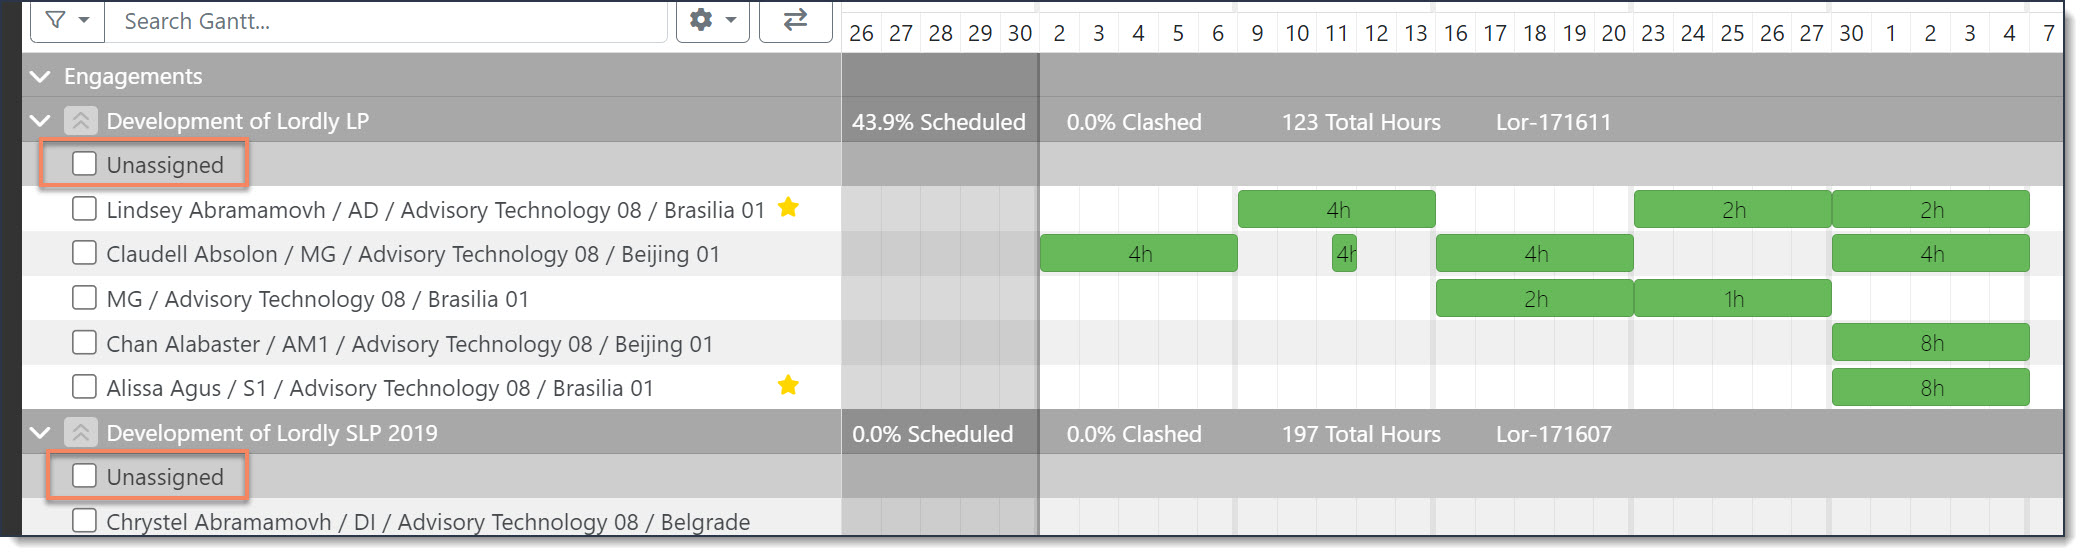
Selected check-boxes show as ticked when everything in the entity is selected, i.e. all resource rows in an Engagement or all bookings in a resource row. If contents of an entity are only partially selected, these are highlighted with a dash:

Partial selections are marked as highlighted above
Ctrl+Click can be used to deselect any resource rows that are not wanted in the group selection, and also used to add further unassigned header resource row groups or individual resource rows to the current selection.
-
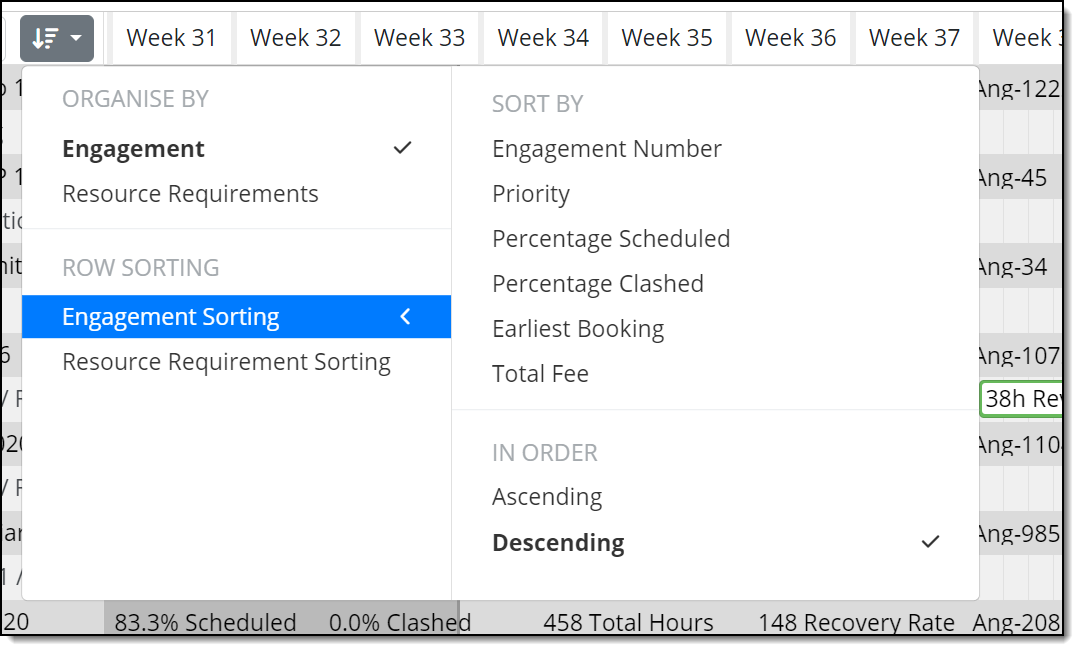
To make it easier to view and organise unassigned bookings, click the Unassigned Bookings icon and you will be prompted for your sort preferences. Within ORGANISE BY, click Engagement or Resource Requirements and the Row sorting options presented to you will also vary depending on your selection:
-
Select an unassigned booking that you can see in the bottom panel.
You can see the key details in the booking sidebar, and you will also notice that numbers appear next to the names of all the resources in the top of the Gantt. These numbers indicate each of the resource’s suitability score to complete the booking and are made up of several factors which can be seen in the tooltip that appears if hovering on the score (for more information in the suitability score see section below).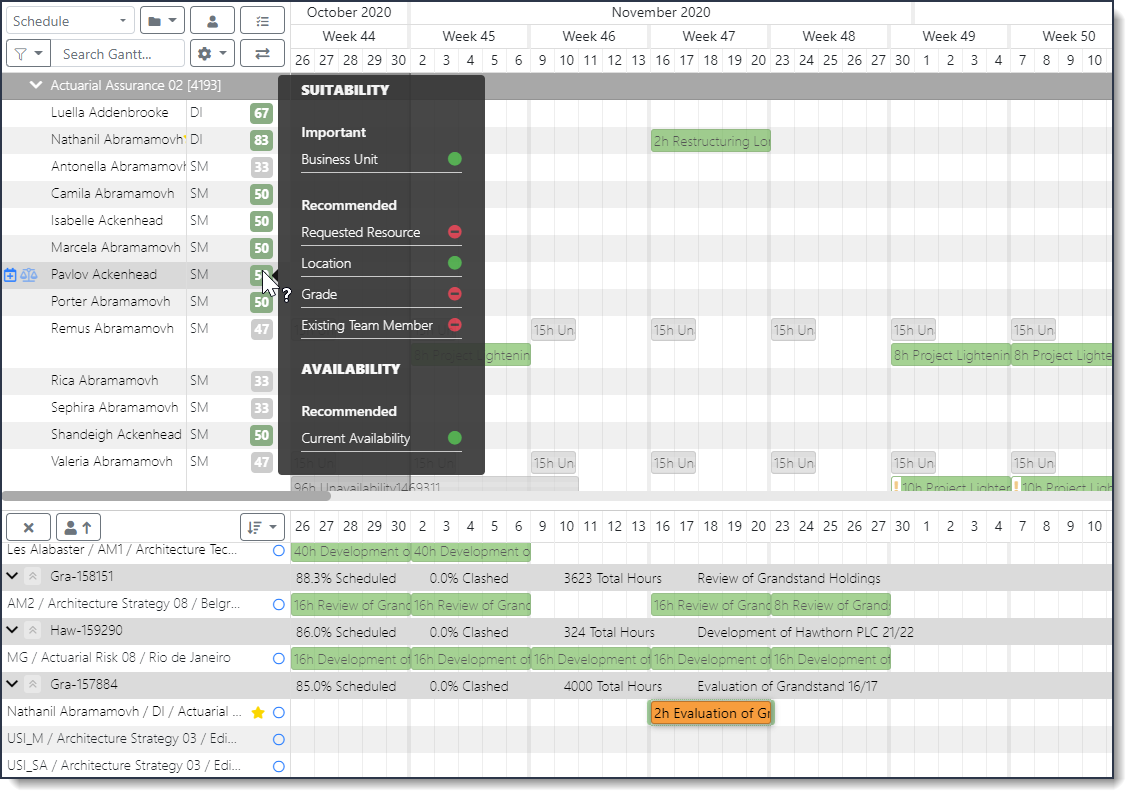
-
You can assign bookings in the following three ways, which may suit your personal preference or the most efficient operation for your circumstances:
-
If you want to assign to a resource that you can see in your Gantt view, you can hover your mouse over their name and click the small purple assign button that appears to the left of their name:

-
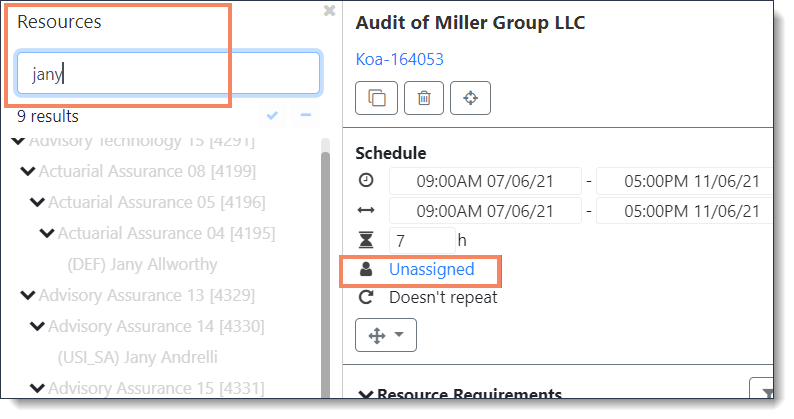
If you want to quickly assign to a resource that you can’t see in your Gantt view, you can click the booking to display the Gantt sidebar and click Unassigned, where you can then locate and select the resource:
-
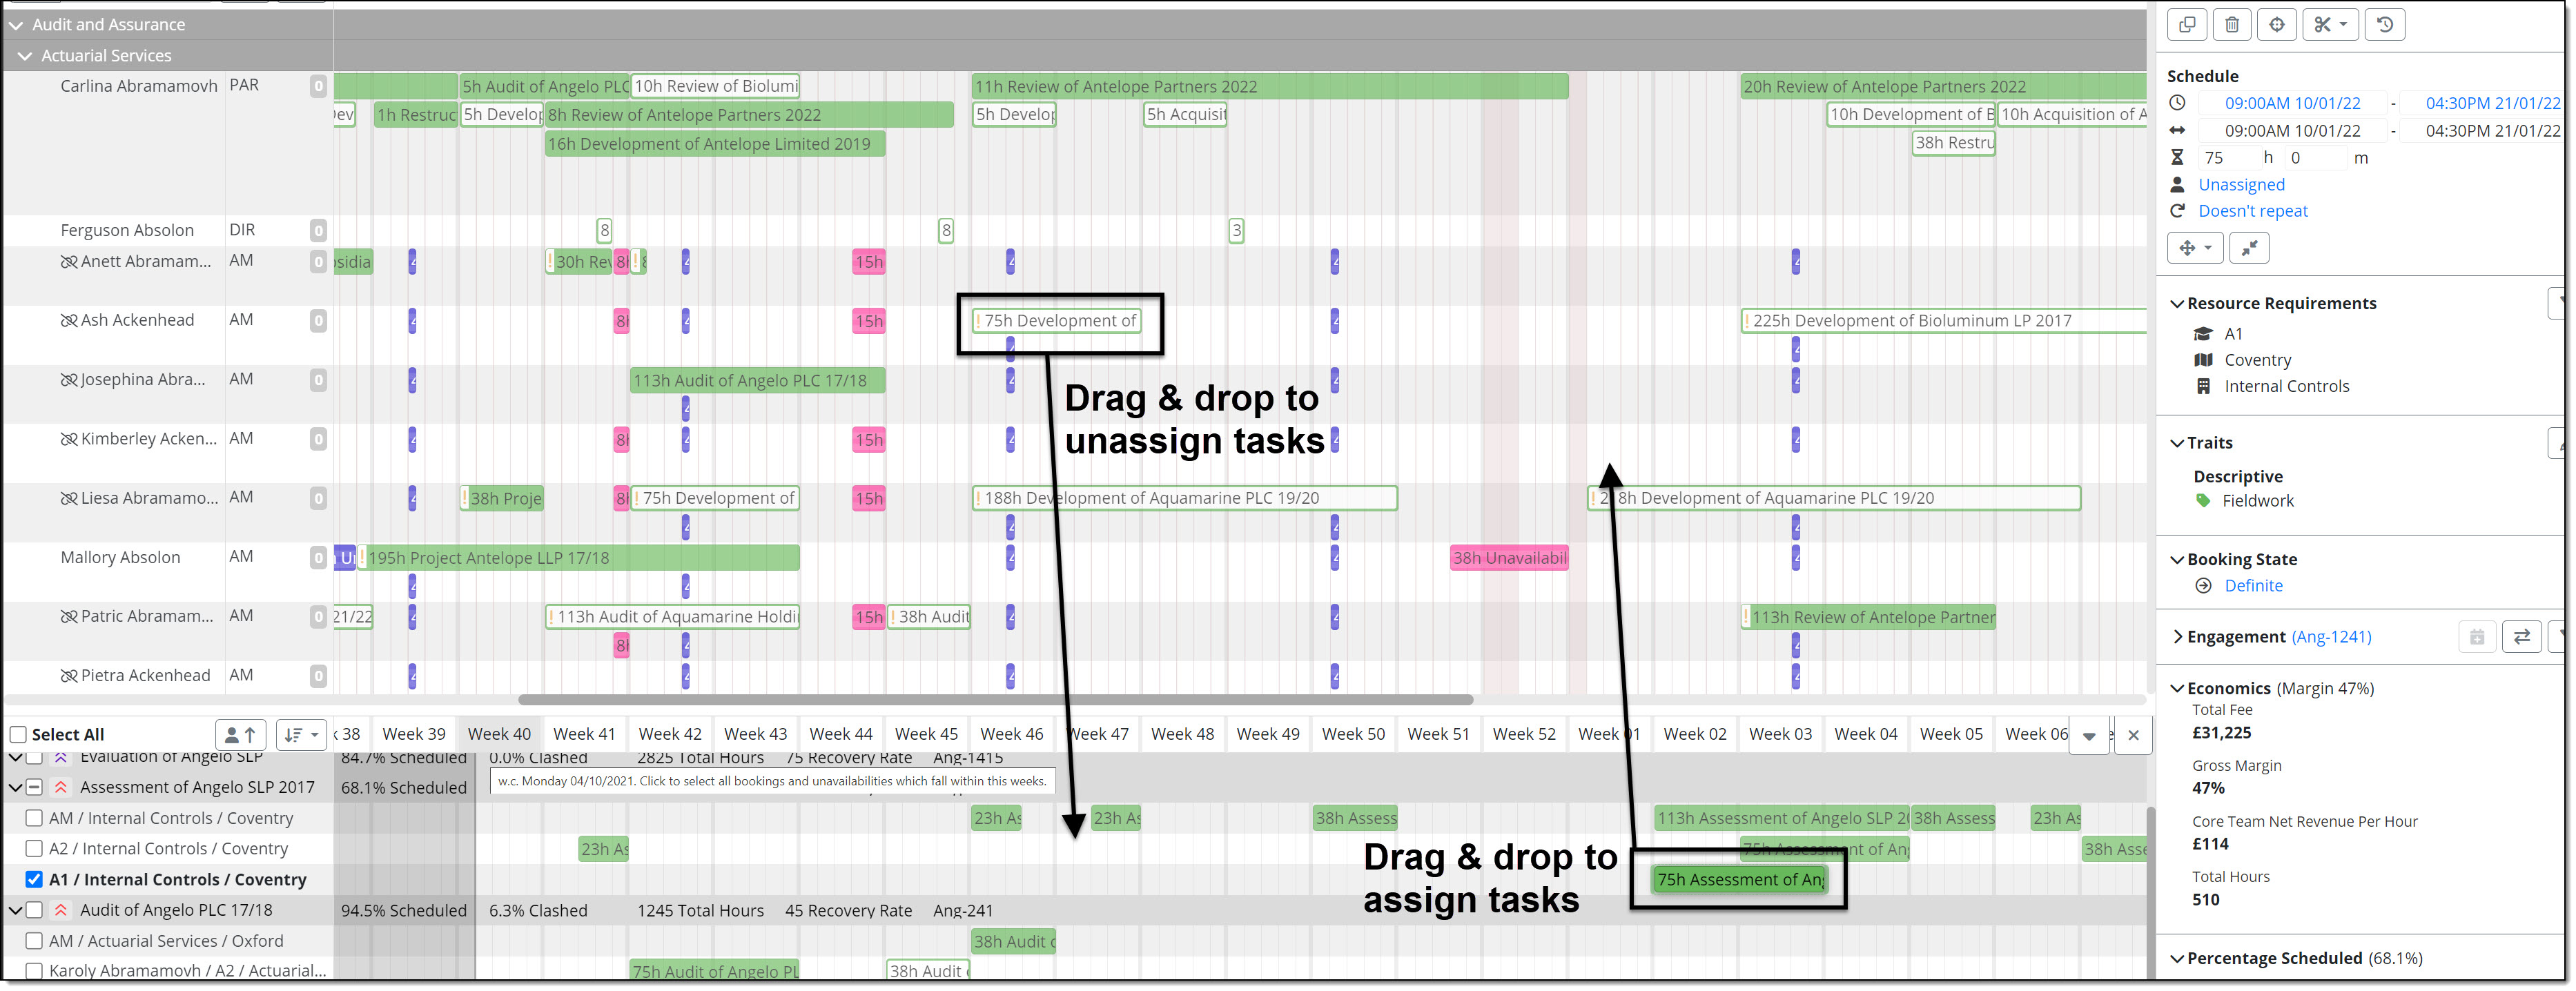
If you want to quickly assign and move in time in one operation, you can select the unassigned booking and drag and drop it from the unassigned pane to the required resource and time on the main Gantt.
Multi-select can be used when assigning two or more bookings from a single resource row to another single resource row.
-
A large number of unassigned bookings can be auto-assigned using automation. Refer to Automation for the full process on how to do this.
-
-
Select Save at the top right of the Gantt to save all changes. `